Key Takeaways
Artificial turf installation Vista CA results depend more on excavation, compaction, and drainage design than the turf roll itself. A clear scope review—covering base build-up, drainage needs, seams, and edging—helps you compare quotes accurately and avoid problems that are harder to fix after installation.
- Cost Is Driven by Site and Scope, Not Just Turf: Budgets typically hinge on demolition/haul-away, base depth and compaction, drainage work, and the complexity of cuts, seams, borders, and access conditions like slopes, trees, or tight side yards.
- Permits and HOA Rules May Apply Depending on What Changes: While some lawn replacements may be treated like a landscape upgrade, grading that redirects stormwater, new drainage connections, retaining walls, concrete flatwork, or work near easements/utilities can trigger city review and HOA approval requirements.
- Drainage Planning and Base Prep Prevent Pooling, Odor, and Movement: Most installs rely on correct grading plus a compacted, permeable aggregate base under turf with permeable backing, but persistent low spots or runoff constraints may require added drainage features like a French drain or area drains.
Artificial turf installation Vista CA typically involves budgeting for materials and labor, checking whether a city permit is required for your specific project, and ensuring the site is graded and drained correctly to prevent pooling and odor issues. Because turf is installed over a prepared base rather than soil, the long-term performance depends less on the grass itself and more on excavation depth, compaction, and drainage design.
In Vista’s warm, dry conditions, homeowners often choose turf to reduce irrigation demand, but proper drainage and infill selection still matter for heat, durability, and pet use. Installation usually includes removing existing sod, building a compacted aggregate base, adding edging, and placing a permeable backing with seams that must be secured to avoid shifting or visible lines.
This guide breaks down what drives cost, when permits may apply, how drainage is typically handled, and what to expect during the install—from site evaluation and base prep to final brushing and cleanup.
What Drives Artificial Turf Installation Cost in Vista, CA
Most project budgets come down to site conditions, base construction, material selection, and finishing details—not just the turf roll itself.
For artificial turf installation Vista CA projects, the biggest cost variables are typically the amount of excavation and hauling required, the thickness and quality of the aggregate base, and the complexity of cuts, seams, and borders. A simple rectangular lawn on level ground is usually faster and more predictable than a yard with slopes, tight side access, trees, irrigation hardware to cap, or curved planting beds.
When comparing quotes, make sure you’re comparing “apples to apples” on scope. Two estimates can look similar on paper while including very different base depth, compaction effort, edging type, or drainage features.
- Site access and demolition: Removing sod, roots, and old landscape materials, plus hauling and dump fees, can swing the total significantly.
- Base depth and compaction: A stable, well-compacted base reduces ripples, low spots, and seam stress over time.
- Drainage approach: Addressing poor native drainage may require added base depth, a drain line, or regrading.
- Turf type: Face weight, pile height, backing type, and intended use (pets, play, putting) affect material selection.
- Edges and transitions: Concrete mow strips, bender board, metal edging, and transitions to pavers can add labor.
- Infill choice: Options differ in feel, stability, heat behavior, and odor management for pet areas.
Permits, Rules, and HOA Approval: What to Check in Vista
Some turf projects do not need permits, but grading, drainage changes, or hardscape work can trigger requirements—so it’s smart to confirm before you start.
In many cases, replacing an existing lawn with synthetic turf is treated like a landscape upgrade rather than a structural remodel. However, if your plan includes adding drainage connections, altering runoff patterns, building retaining walls, or pouring concrete, you may need city review or HOA approval. Because requirements can change based on property type and scope, it’s best to verify directly with the City of Vista and your HOA (if applicable) before scheduling demolition.
- Ask whether a permit is required if you are:
- Changing grades in a way that could redirect stormwater
- Installing new drain lines tied into an existing drainage system
- Adding concrete flatwork, seat walls, retaining walls, or steps
- Working in easements or near protected utilities
If you’re in a planned community, keep an eye on design rules that may specify acceptable pile heights, color blends, edging types, or whether turf is allowed in the front yard. Getting written approval first can prevent expensive rework.
Site Evaluation: The Pre-Install Checklist That Prevents Problems
A good evaluation focuses on drainage, soil behavior, and how the space is used—because those factors determine the base and material specs.
Before ordering materials, installers typically evaluate slope direction, low points, downspouts, and how water behaves during irrigation or rain. In Vista, dry conditions can hide drainage issues until a heavy storm; a yard that “seems fine” in summer may still pond in winter or during occasional downpours.
- Questions to answer before install:
- Where does runoff currently flow, and where should it go?
- Are there known soggy areas, pet odor zones, or mud paths?
- Will the space be used for pets, kids, entertaining, or sports?
- Are there tree roots or irrigation lines that will interfere with excavation?
- Do you need door clearance for sliding doors or gates after adding the base and turf?
It’s also the right time to decide on finished elevations. Turf should typically sit cleanly against patios, walkways, and planters without creating a trip edge or directing water toward the home.
Base Prep and Drainage: Where Long-Term Performance Is Won or Lost
Artificial turf is only as good as the base beneath it; proper excavation, compaction, and drainage prevent unevenness, odor, and seam stress.
Most installations remove existing sod and a portion of topsoil, then replace that volume with a compactable aggregate base. The goal is a firm, well-draining layer that resists settling and maintains the intended slope. Because drainage performance depends on the whole system (subgrade, base, backing, and outlets), there isn’t a one-size-fits-all depth or method that’s correct for every yard.
Typical Base Build-Up (Residential Landscapes)
A common build includes excavation, weed barrier (where appropriate), aggregate base in lifts, and final grading for consistent slope.
- Excavate existing grass/soil to the planned depth while maintaining intended slope away from structures.
- Address the subgrade by removing soft spots and creating a smooth, compactable surface.
- Install a separator fabric where useful to reduce base migration into soil (site-dependent).
- Add aggregate base in layers (“lifts”) and compact each layer to reduce future settling.
- Fine-grade the top to eliminate birdbaths (tiny low spots) and preserve drainage direction.
Base material selection can vary, but it’s typically a crushed aggregate that compacts well while still allowing water to pass through. Your installer should explain what they’re using and why, especially if your yard has expansive clay behavior or known drainage issues.
Drainage Options (And When You Might Need More Than a Basic Base)
Many yards drain well with correct slope and a permeable base, but certain layouts need additional drainage features.
- Basic surface grading: Ensures water moves off the turf and toward an appropriate outlet.
- Permeable base + permeable backing: Helps water pass through the system instead of sheeting on top.
- French drain or area drains: Useful for persistent low spots, downhill constraints, or yards collecting neighbor runoff.
- Downspout management: Redirecting roof runoff prevents concentrated flows from undermining edges or creating ruts.
If you’ve ever seen standing water after a storm, mention it early. Fixing drainage after turf is installed can mean cutting the turf, adding drains, and re-seaming—doable, but avoidable with a thorough plan up front. If you’re seeing symptoms already, reviewing signs of drainage problems can help you describe what’s happening in your yard before the install.
Material Selection: Picking Turf and Infill for Vista’s Heat and Use Cases
The “best” turf depends on how you’ll use it—pets, play, aesthetics, or putting—plus comfort considerations in warm weather.
Vista’s climate makes water savings appealing, but it also means turf can warm up in direct sun. While no synthetic surface stays as cool as irrigated natural grass in peak heat, choices like fiber type, color blend, pile height, and infill can affect feel and performance. Ask for product samples outside in sunlight, and consider where shade falls throughout the day.
Turf Specs That Matter in Real-World Use
Instead of focusing on a single “premium” label, review a few specs together and match them to your goals.
- Intended use: Landscape turf differs from putting green turf or playground systems.
- Pile height and density: Taller blades can look lush, while higher density can feel more supportive and hide backing.
- Blade shape: Some shapes are designed to spring back more effectively after foot traffic.
- Backing and permeability: Drainage rate depends on backing design and installation, not marketing claims alone.
- UV stability: Important for long-term color stability in sunny yards.
If your primary use is pet-friendly, choosing a setup designed for faster drainage and easier rinsing can reduce odor issues. For dedicated dog areas, consider a purpose-built option like pet turf & artificial grass for dogs, where the material and drainage approach can be matched to frequent use.
Infill Choices: Stability, Comfort, and Odor Control
Infill adds weight, supports blades, and affects footing, heat, and how easily the turf rinses clean.
- Standard sand-based infill: Common for blade support and stability; performance depends on quantity and brushing.
- Antimicrobial or odor-control infill (pet areas): Can help, but it does not replace proper drainage and routine rinsing.
- Low-infill or no-infill products: Some systems minimize infill needs, but still require correct base prep and seam work.
Because infill selection can be subjective (feel, tracking into the house, pet use), it helps to see a few finished installations or test patches if possible.
Installation Steps: What to Expect During the Turf Build
A professional install follows a sequence that prioritizes grade accuracy, secure seams, and tight edges.
Although each yard is different, most artificial turf installation Vista CA projects follow a similar workflow. Knowing the steps helps you spot quality indicators—like smooth transitions, invisible seams, and consistent blade direction—before the crew leaves.
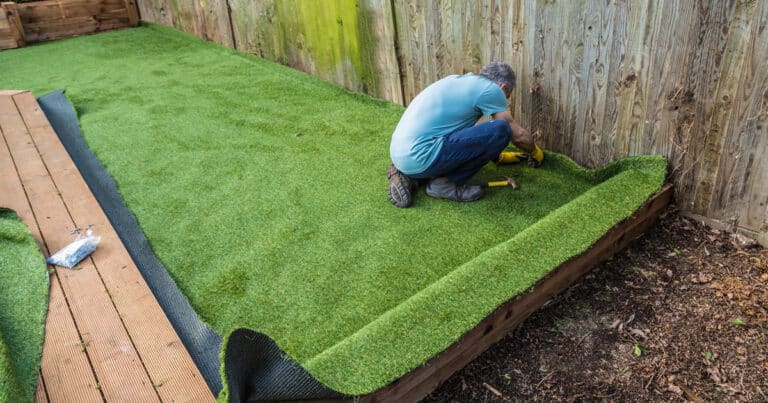
- Demolition and haul-away: Remove sod, plants (as planned), and debris.
- Set grades and install base: Add and compact aggregate, checking for low spots.
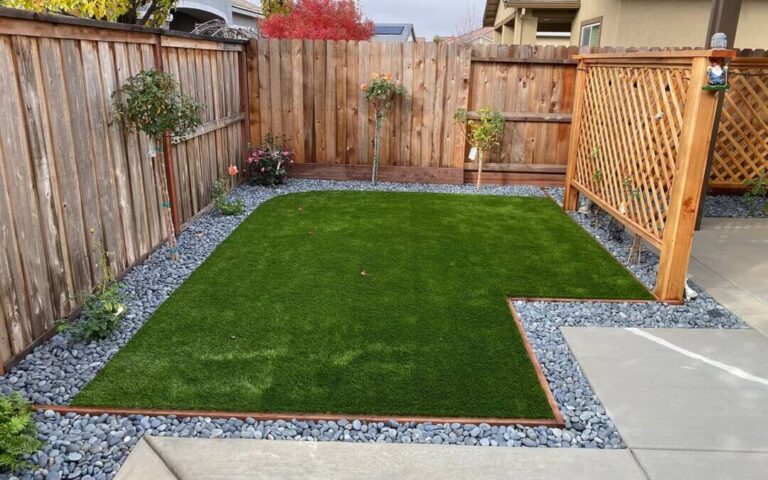
- Install edging: Create a firm perimeter to prevent movement and keep lines crisp.
- Roll out turf and align grain: Ensure consistent blade direction across the area.
- Cut, seam, and secure: Join pieces carefully to reduce visible seam lines.
- Infill and power broom: Distribute infill evenly and brush fibers upright.
- Final detail work: Tuck edges, clean hardscape, and confirm drainage behavior.
Seams, Edges, and Transitions: The Details People Notice
Clean seams and edges are often the difference between “looks real” and “looks installed.”
Seams should be tight, flat, and aligned so the grain runs the same direction. Edges should be anchored so the perimeter doesn’t curl, spread, or separate from borders over time. Transitions at concrete, pavers, and planters should be flush and intentional—especially around patios where people walk barefoot.
- Quality checks to look for:
- No visible gaps or ridges along seams
- Consistent blade direction (no “patchwork” shading)
- Secure perimeter attachment with a clean, even line
- Finished surface that sheds water without pooling
Reference Guide: Matching Installation Choices to Yard Conditions
This quick comparison highlights how site conditions commonly influence base, drainage, and finishing decisions.
| Yard Condition / Goal | Installation Focus | Vista-Specific Considerations |
|---|---|---|
| Low spots or past puddling | Correct grading; consider supplemental drains if water has no outlet | Dry seasons can mask drainage issues until storms; verify flow paths before install |
| Pets using the same area daily | Fast-draining base; odor-aware infill options; easy rinse access | Plan hose access and runoff direction so rinse water doesn’t collect near doors |
| High foot traffic (kids, entertaining) | Dense turf selection; solid compaction; reinforced edges | Sun exposure may increase surface warmth; consider shade planning where possible |
| Sloped yard | Anti-slip stability through proper base and secure anchoring | Confirm runoff doesn’t discharge onto neighbors or back toward structures |
| Crisp borders next to beds or hardscape | Edging selection; precise cuts; tight tucking and fastening | Heat and expansion can reveal sloppy edges over time; secure perimeters matter |
Maintenance After Installation: Keeping Turf Clean, Upright, and Odor-Free
Artificial turf is lower maintenance than natural grass, but it still needs routine cleaning and periodic brushing—especially in pet yards.
Regular upkeep protects drainage performance and keeps the surface looking even. Dust, leaves, and pet waste can build up in the fibers and infill, and that buildup is what often causes odor and slower drainage—not the turf itself.
- Simple maintenance habits:
- Remove leaves and organic debris so it doesn’t break down into the infill
- Rinse pet areas as needed, especially during warm spells
- Brush high-traffic paths to stand fibers back up and redistribute infill
- Inspect edges and seams periodically, particularly after heavy use
If your yard collects a lot of tree litter, a consistent routine matters more than occasional deep cleans. For practical guidance on keeping the surface clear, see tips to remove debris from artificial grass.
For homeowners who prefer not to handle periodic deep cleaning or brushing, scheduling artificial grass maintenance & cleaning can help restore fiber lift and address infill and odor issues before they become persistent.
Common Risks and How to Avoid Them
Most turf problems trace back to shortcuts in base prep, drainage planning, or seam/edge finishing, so a careful scope review is your best protection.
Synthetic turf is a system: turf + base + drainage + installation details. If one piece is underspecified, you may see symptoms like ripples, visible seams, shifting edges, persistent odor, or puddling. Some issues can be repaired, but fixing them later is typically more disruptive than doing it correctly from the start.
- Risks to watch for:
- Pooling water: Often caused by uneven base grading or blocked drainage pathways
- Odor in pet areas: Usually linked to inadequate drainage, insufficient rinsing, or organic buildup
- Visible seams: Can result from misaligned grain, poor seam tape/glue work, or base movement
- Edge curl or lifting: Often due to weak perimeter anchoring or inconsistent base height at borders
- Weeds: Typically come from windblown seeds rooting in debris on top, not from “growing through” dense turf
It can also help to understand the material category itself—how it’s generally constructed and used—by reviewing an overview of artificial turf.
Planning Your Project Timeline in Vista: From Demo to Final Brush
Most residential installs move quickly once materials are on-site, but scheduling can hinge on access, weather, and how much grading is needed.
A straightforward yard can progress from demolition to finished brushing in a short window, while complex yards (tight access, multiple zones, drainage additions, extensive edging) take longer. If you’re coordinating other trades—pavers, fencing, pool work, or irrigation repairs—sequence matters, because heavy equipment after turf installation can damage seams and compact the surface unevenly.
- Ways to reduce delays:
- Confirm access paths for wheelbarrows and compactors
- Mark sprinkler lines, low-voltage lighting, and utility concerns before excavation
- Choose turf, edging, and infill early so materials are ready when demo starts
- Plan drainage outlets and downspout routing before base goes in
A Smarter Way to Choose an Installer (And a Better Scope of Work)
The best results usually come from clear scope, documented assumptions, and a drainage-first approach—not from choosing based on turf samples alone.
When you’re comparing installers, ask how they handle base depth decisions, compaction method, and drainage validation. A thorough proposal should describe what’s included (and what isn’t), including demolition, disposal, base specs, edging type, seam method, and cleanup. If a quote is vague, ask for clarification in writing so you can compare fairly.
- Questions worth asking before signing:
- How will you confirm proper slope and prevent low spots?
- What base material will be used, and how will it be compacted?
- How are seams joined and secured to prevent separation?
- What edging method is included around beds, fences, and hardscape?
- What maintenance do you recommend for my specific yard use (pets, shade, trees)?
If you want a single contractor who can advise on turf types and layout options across multiple zones (front yard, side yard, patios, dog runs), it may help to review artificial turf applications for every part of your property so the design and installation details work together from the start.
Frequently Asked Questions
Get a Turf Install Plan That Fits Your Yard, Drainage, and Daily Use
If you’re considering synthetic turf in Vista, the smartest next step is confirming what your yard actually needs—base depth, grading, and drainage—before you commit to a product or a quote. A quick site review can help you avoid common issues like low spots, shifting edges, visible seams, or pet odor areas that are hard to fix after installation.
Working with a local team also helps you clarify scope items that affect cost and results, such as haul-away, edging details, and how runoff will be handled around patios, planters, and downspouts.